How To Change Video Resolution
You can change video resolution with video editing software like VideoStudio. Follow along with our tutorial below to learn the easiest way to change video resolution. Video resolution is extremely important to get right when both shooting and editing. Most cameras today record in standard HD (1080p), and some shoot in 4K which is four times as high resolution. When your video has been edited then changing the video resolution will determine the resolution of the file that is outputted. For most cases, a 1080 file will be fine. But if you’re gearing up to display the film on a 4K TV then you may want to consider going a little bigger.
-
Install VideoStudio
To install VideoStudio video editing software on your PC, download and run the installation file above. Continue following on-screen instructions to complete the setup process.
-
Setting up your video resolution
When editing your video, it is important that you have the correct video resolution set. VideoStudio automatically sets the video resolution based on the first clip you add to your timeline when you start a new project. Although often this is correct, there are some instances where you need to adjust your video resolution.
![Setting up your video resolution]()
-
Adjust video resolution
To do so, go to ‘Settings’ and then ‘Project Properties’. Here you can use the ‘Project Format’ dropdown to find the formats you are looking for. Highlight the profile you wish you edit in, and press OK. you can also set up custom profiles by selecting ‘New’ and entering in your resolutions.
![Adjust video resolution]()
-
Edit resolution upon export
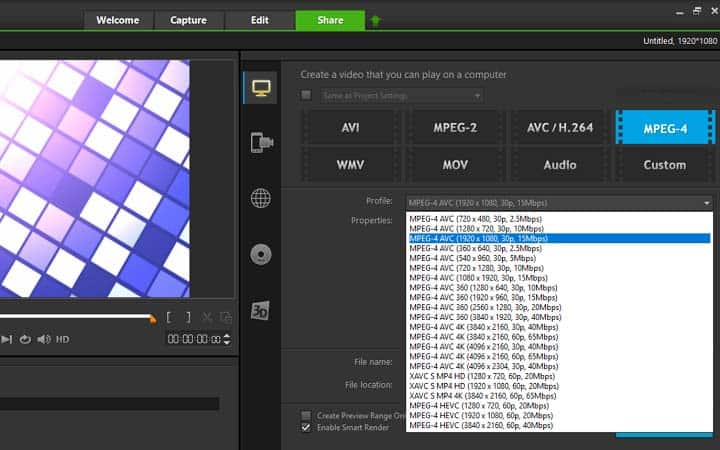
Alternatively, when exporting your video, under the share tab, you can select your video resolution. This is a great feature for when you want to edit in high res, but export in lower resolutions to optimize for specific devices.
![Edit resolution upon export]()


